Participant List
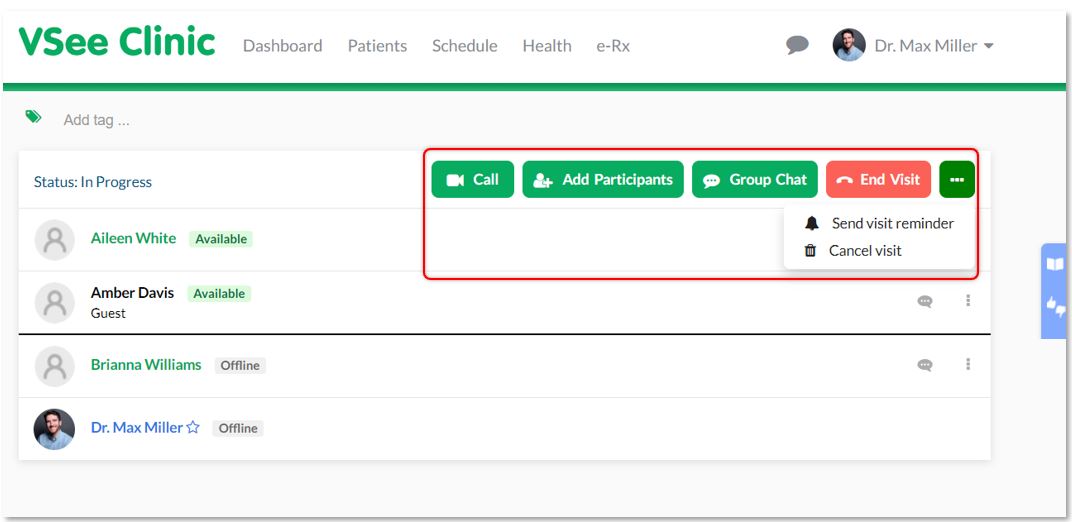
All participants of the meeting are now listed:
- Provider (blue)
- Patient (green)
- Guests (black)
The black line separates those currently in the call and those who have left or not yet joined.
Open Patient Chart
Click on a patient's name to view their patient details page.
From the Patient Details page, click All Participants to return to the participant list.
Participant Controls
As a meeting host, you can send a chat, remotely mute, or remove a patient or guest from the call.
Meeting-related Controls
Call, Add Participants (Invite Guest), and other meeting-related controls are grouped on top.
 Invite Guest
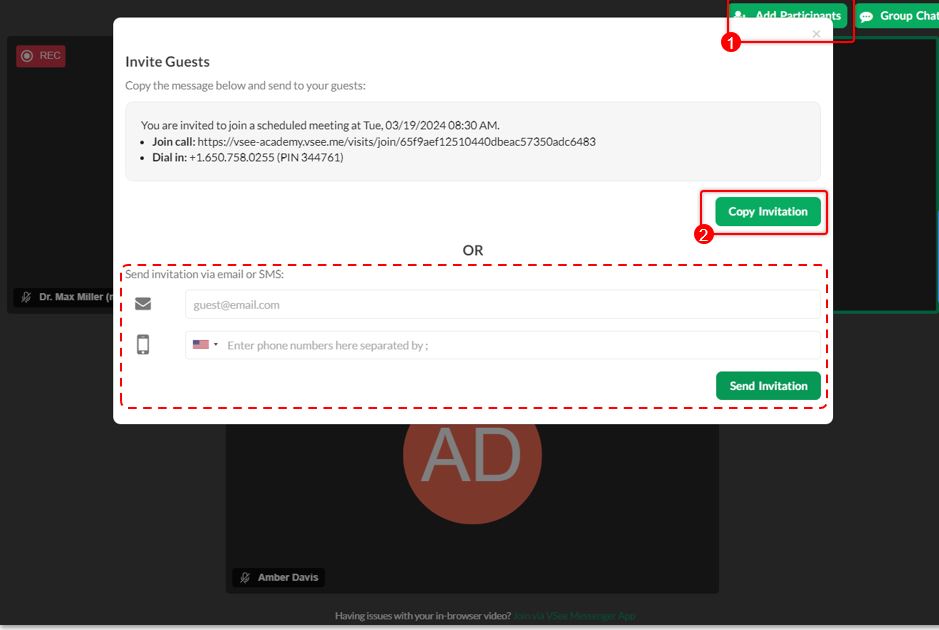
1. To send the Guest Invite Link, click on Add Participants.
2. Click Copy Invitation and send to the guests the guest invite link and the Dial in number and PIN.
You can also enter the email address and phone number of the guests and click Send Invitation.
 During the Call
When you get into the call, the default view is Maximized screen.
To view the Patient Details page, you need to switch to the Minimized screen.
Click on Toggle maximize view icon.
If you are in a group call, click on the patient name whom you want to view the visit details page with.
Click on the same icon to return to the default Maximized view.
Tagging
Tagging is now supported for both one-on-one and group calls.
Patient Details View
Individual patient’s chart
Important visit info like Visit ID, Visit type, Visit Option, etc.
For the SOAP Notes, which is current we optimized the layout to save you from endless scrolling when the chart gets long. Simply scroll down / up to toggle the 2 views.
Note: some features may not be available on your clinic. Please inquire our sales support for more information.
End Visit
More intuitive hang-up to support your different workflows.
1. Click on the red phone icon.
2. Select End Visit for All to end the call for everyone and complete the visit. Select Leave only if another Clinic staff will call the patient.
Send Feedback
1. To send Feedback, click the blue bar icon on the right. Click on the thumbs-up/down icon.
2. Add your VSee experience rating, type of issue, more details/suggestions/comments, Visit ID number, screenshot, or video.
Note: Leave the checkbox for VSee may contact me about my feedback if you want to be contacted by our support team.
3. Click on Submit.
Need more assistance? Send us an email at help@vsee.com or check out the Help section under the Profile Menu of your VSee Clinic.
